> ## Documentation Index
> Fetch the complete documentation index at: https://docs.viewmargin.com/llms.txt
> Use this file to discover all available pages before exploring further.
# ❄️ Snowflake
> Connect Snowflake data to Margin
**Authentication Method**: Margin uses **RSA key pair authentication** to connect to Snowflake.
You'll generate an RSA private key (`.p8` file) and configure the public key on your Snowflake user.
If you encrypt your private key with a passphrase, you'll need to enter it in Margin during setup.
## 1. Snowflake Credential Setup
Margin needs a dedicated Snowflake user with:
* scoped read access to the specific source schemas/tables you approve
* permission to create and manage schemas in a dedicated Margin database
If you use an existing user, make sure it has both sets of privileges.
### How Margin Integrates
| Component | Description |
| :----------------------------------------------- | :-------------------------------------------------------------------------------------------------------------------------------------------------------------------------------- |
| **Scoped read access to selected source tables** | Lets Margin model from approved source tables while your team controls exactly what is exposed (including masking and explicit exclusions). |
| **Dedicated Margin database access** | Lets Margin create and manage its own schemas/tables for intermediate and final model outputs while keeping Margin artifacts isolated from your production databases and schemas. |
Margin does not write into your existing source schemas. Everything Margin produces lives in schemas created under your dedicated Margin database.
### Create a Snowflake User
Below is a **step-by-step guide to set up a Snowflake user with the necessary permissions**:
**Generate RSA Key Pair**
Run these commands in your terminal to generate your [private key](https://docs.snowflake.com/en/user-guide/key-pair-auth#step-1-generate-the-private-key) and [public key](https://docs.snowflake.com/en/user-guide/key-pair-auth#step-2-generate-a-public-key):
```bash theme={null}
$ openssl genrsa 2048 | openssl pkcs8 -topk8 -inform PEM -out rsa_key.p8
$ openssl rsa -in rsa_key.p8 -pubout -out rsa_key.pub
```
| File | What to do with it |
| ------------- | --------------------------------------------------- |
| `rsa_key.p8` | Upload to Margin during setup (keep secure) |
| `rsa_key.pub` | Copy contents into the `ALTER USER` statement below |
If you set a passphrase, remember it. You will need to enter it in Margin.
**Locations to fill in required fields are highlighted in green**
```sql theme={null}
-- Margin user/role details
SET margin_default_warehouse = ''; -- e.g. 'COMPUTE_WH'
SET margin_database = ''; -- e.g. 'MARGIN_DB'
SET source_database = ''; -- e.g. 'APP_DB'
SET source_schema = ''; -- e.g. 'EVENTS_SCHEMA'
SET source_table_1 = ''; -- e.g. 'PAYMENT_EVENTS'
SET source_table_2 = ''; -- e.g. 'KYC_EVENTS'
SET margin_comment = 'For Margin integrations';
-- Use a high-privileged role and create Margin role/user
USE ROLE ACCOUNTADMIN;
CREATE ROLE IF NOT EXISTS MARGIN_ROLE
COMMENT = $margin_comment;
CREATE USER IF NOT EXISTS MARGIN_USER
DEFAULT_WAREHOUSE = $margin_default_warehouse
DEFAULT_ROLE = MARGIN_ROLE
COMMENT = $margin_comment;
ALTER USER MARGIN_USER
SET RSA_PUBLIC_KEY='MIIB...'; -- Copy the public key from the step above
GRANT ROLE MARGIN_ROLE TO USER MARGIN_USER;
```
```sql theme={null}
---------------------------------------------------------------------------
-- Warehouse usage for query execution
---------------------------------------------------------------------------
GRANT USAGE ON WAREHOUSE identifier($margin_default_warehouse)
TO ROLE MARGIN_ROLE;
---------------------------------------------------------------------------
-- Dedicated Margin database where Margin can create/manage its own schemas
---------------------------------------------------------------------------
CREATE DATABASE IF NOT EXISTS identifier($margin_database)
COMMENT = $margin_comment;
GRANT USAGE ON DATABASE identifier($margin_database)
TO ROLE MARGIN_ROLE;
GRANT CREATE SCHEMA ON DATABASE identifier($margin_database)
TO ROLE MARGIN_ROLE;
```
```sql theme={null}
---------------------------------------------------------------------------
-- Grant database usage, then repeat schema usage for each source schema
-- that contains tables you want Margin to read.
---------------------------------------------------------------------------
GRANT USAGE ON DATABASE identifier($source_database)
TO ROLE MARGIN_ROLE;
SET grant_schema_usage_sql_command = 'GRANT USAGE ON SCHEMA '
|| $source_database || '.' || $source_schema || ' TO ROLE MARGIN_ROLE';
EXECUTE IMMEDIATE $grant_schema_usage_sql_command;
```
Copy and paste for each table you want Margin to read:
```sql theme={null}
----------------------------------------------------------------------------
-- Table-level SELECT for
----------------------------------------------------------------------------
SET grant_table_select_1 = 'GRANT SELECT ON TABLE '
|| $source_database || '.' || $source_schema || '.' || $source_table_1
|| ' TO ROLE MARGIN_ROLE';
EXECUTE IMMEDIATE $grant_table_select_1;
----------------------------------------------------------------------------
-- Table-level SELECT for
----------------------------------------------------------------------------
SET grant_table_select_2 = 'GRANT SELECT ON TABLE '
|| $source_database || '.' || $source_schema || '.' || $source_table_2
|| ' TO ROLE MARGIN_ROLE';
EXECUTE IMMEDIATE $grant_table_select_2;
```
Configure the columns you want to mask in specific tables.
* **Recommended**: Use **Option 1: built-in masking policies** if you have **Snowflake Enterprise**.
* Otherwise, **Option 2: secure views** lets you expose a restricted projection.
```sql Option 1: Masking Policy theme={null}
----------------------------------------------------------------------------
-- Snowflake masking policies are strongly typed. Create one policy per type.
----------------------------------------------------------------------------
CREATE OR REPLACE MASKING POLICY HIDE_STRING_FROM_MARGIN AS (VAL STRING) RETURNS STRING ->
CASE
WHEN CURRENT_ROLE() = 'MARGIN_ROLE' THEN '****'
ELSE VAL
END;
CREATE OR REPLACE MASKING POLICY HIDE_NUMBER_FROM_MARGIN AS (VAL NUMBER) RETURNS NUMBER ->
CASE
WHEN CURRENT_ROLE() = 'MARGIN_ROLE' THEN 0
ELSE VAL
END;
CREATE OR REPLACE MASKING POLICY HIDE_DATE_FROM_MARGIN AS (VAL DATE) RETURNS DATE ->
CASE
WHEN CURRENT_ROLE() = 'MARGIN_ROLE' THEN NULL
ELSE VAL
END;
CREATE OR REPLACE MASKING POLICY HIDE_VARIANT_FROM_MARGIN AS (VAL VARIANT) RETURNS VARIANT ->
CASE
WHEN CURRENT_ROLE() = 'MARGIN_ROLE' THEN NULL
ELSE VAL
END;
ALTER TABLE ..
MODIFY COLUMN SET MASKING POLICY HIDE_STRING_FROM_MARGIN;
```
```sql Option 2: Secure View theme={null}
----------------------------------------------------------------------------
-- Create a secure view that excludes/masks sensitive fields, then grant SELECT.
----------------------------------------------------------------------------
REVOKE SELECT ON TABLE .. FROM ROLE MARGIN_ROLE;
CREATE OR REPLACE SECURE VIEW .. AS
SELECT
,
FROM ..;
GRANT SELECT ON VIEW ..
TO ROLE MARGIN_ROLE;
```
Margin creates and manages its own schemas inside your dedicated Margin database.
```sql theme={null}
USE ROLE MARGIN_ROLE;
USE DATABASE identifier($margin_database);
CREATE SCHEMA IF NOT EXISTS margin_validation_schema;
CREATE OR REPLACE TABLE margin_validation_schema.permission_check (id INT);
INSERT INTO margin_validation_schema.permission_check VALUES (1);
SELECT * FROM margin_validation_schema.permission_check; -- should return 1
DROP TABLE margin_validation_schema.permission_check;
DROP SCHEMA margin_validation_schema;
```
This grants control only where explicitly allowed. `MARGIN_USER` cannot create users/roles or access objects that are not granted to `MARGIN_ROLE`.
If you need to connect to multiple databases, reach out to [hello@viewmargin.com](mailto:hello@viewmargin.com), we can enable this for you.
## 2. Snowflake Connection Configuration
### A. Add a Snowflake Source in Margin
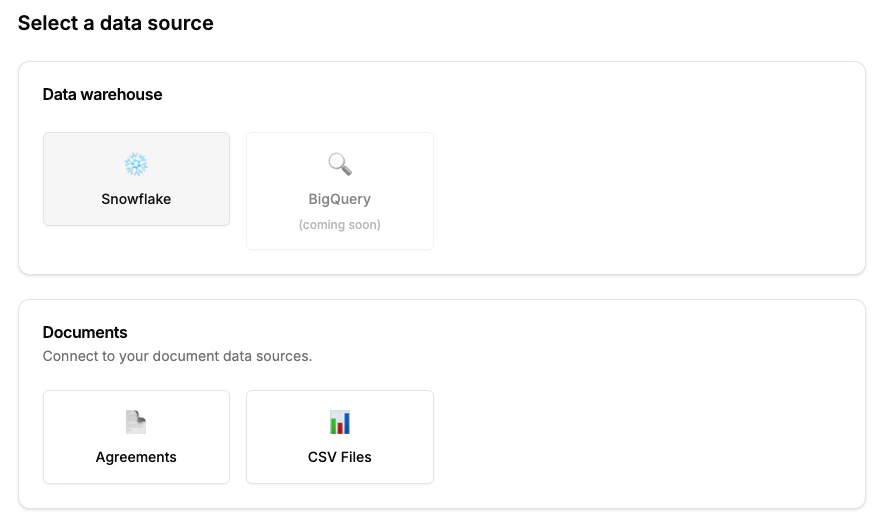
Go to your Integrations page in the Margin dashboard & click **Add Source and select Snowflake.**
 ### B.Enter Snowflake Credentials
Enter the following required fields into Margin:
| Field | Description |
| :------------------------- | ----------------------------------------------------------------------------------------------------------------------------------------------------------------------------------------------------------------------------------------- |
| **Account Identifier** | Account Name prefixed by its Organization (e.g. `myorg-account123`). Format may differ based on Snowflake account age. For details, visit Snowflake docs. |
| **Warehouse** | The warehouse name Margin should use to run queries. |
| **Database** | The default database for Margin queries. |
| **Username** | The Snowflake user you created (e.g., `MARGIN_USER`). |
| **Private Key (.p8)** | The RSA private key file generated during credential setup. |
| **Private Key Passphrase** | (Optional) Required if your private key is encrypted with a passphrase. |
| **Role** | The role you created (or an existing role with the necessary privileges). |
Snowflake accounts can have different identifier formats depending on when they were created. For example, older accounts might look like
### B.Enter Snowflake Credentials
Enter the following required fields into Margin:
| Field | Description |
| :------------------------- | ----------------------------------------------------------------------------------------------------------------------------------------------------------------------------------------------------------------------------------------- |
| **Account Identifier** | Account Name prefixed by its Organization (e.g. `myorg-account123`). Format may differ based on Snowflake account age. For details, visit Snowflake docs. |
| **Warehouse** | The warehouse name Margin should use to run queries. |
| **Database** | The default database for Margin queries. |
| **Username** | The Snowflake user you created (e.g., `MARGIN_USER`). |
| **Private Key (.p8)** | The RSA private key file generated during credential setup. |
| **Private Key Passphrase** | (Optional) Required if your private key is encrypted with a passphrase. |
| **Role** | The role you created (or an existing role with the necessary privileges). |
Snowflake accounts can have different identifier formats depending on when they were created. For example, older accounts might look like ACCOUNT\_LOCATOR.CLOUD\_REGION\_ID.CLOUD, while newer ones may look like ORGNAME-ACCOUNT\_NAME. Check Snowflake’s documentation if unsure.
## 3. Testing the Connection
When you set up Snowflake, Margin verifies:
1. **Basic connectivity check:** Network connection & credential validation
2. **Verify user can create/manage schemas and objects in the dedicated Margin database:**
* Schema lifecycle (CREATE, ALTER, DROP)
* Table lifecycle (CREATE, INSERT, SELECT, UPDATE, DELETE, RENAME, DROP)
* View lifecycle (CREATE, RENAME, DROP)
* Create/Drop STAGE
* Create/Drop FILE FORMAT
Sometimes the initial test might time out, especially if Snowflake is resuming from a suspended state. Simply click Test again to retry. Once a connection is established, further requests usually run quickly.
## Troubleshooting
### Authentication failures
* Ensure you're using an **RSA private key** (`.p8` file), not an SSH key
* Verify the public key is set on your Snowflake user: `DESC USER MARGIN_USER`
* If you used a passphrase when generating the key, enter it in Margin
### Permission errors during testing
* The wizard shows exactly which permissions are missing
* Ensure you completed Step 2 (dedicated Margin database permissions), Step 3 (schema USAGE), and Step 4 (table SELECT grants) in the setup script
### Connection timeout
* Snowflake warehouses may be suspended—click "Test" again to retry
* Check that your account identifier format is correct
## Next Steps
Once the connection is established, you can connect your finance sources to model over your event data.
Connect your finance data sources